1946 Chevy 1/2-Ton
![]()
[an error occurred while processing this directive]
[an error occurred while processing this directive]
[an error occurred while processing this directive]
 |
|
| Owned by Cecil Margosian "51Jimmy" Bolter # 3468 Aptos, California |
# 2492
From Cecil :
Here is my 1946 Chevy 1/2-ton pickup truck.
This is my third ground up restoration in the last five years and probably
my last. I thought it would get easier as I took on each following project.
But, age has a way of letting you know that your mortal.
![]()
I want to thank all the people who helped with the more than normal questions I put forth in the Stovebolt forum.
This was my toughest build of the three trucks that I have done.
I've done a 1951 GMC 1/2-ton (still in the Gallery, since it has not yet been "claimed" by the new owner ~ Editor), a 1953 GMC 1/2-ton (still in the Gallery because it still belongs to Cecil ![]() ~ Editor), and this 1946 Chevy 1/2-ton.
~ Editor), and this 1946 Chevy 1/2-ton.
My thinking was that if I built an older truck, it would be easier because I thought that there wouldn't be as many parts. I should have done some research.
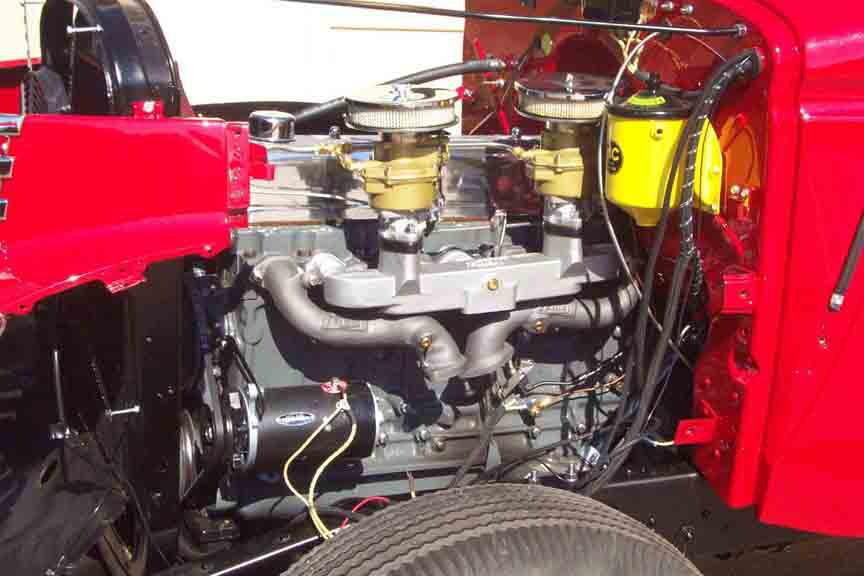
The older trucks have more pieces, and each is smaller than the newer trucks. With this build, I decided to go with a non-factory restoration. I went with a 235 engine that was given to me when I purchased the truck from out of state. The rear end is a 1955 and the transmission is out of a Vega. The driveline didn't have to be altered, which also came out of the Vega. The brake, clutch pedal, and bell housing is out of a 1953. The Artillery wheels were from the previous generation of trucks. The paint color that I picked is from a car I saw in a used car lot -- I think it was a jeep.
The engine [ pix ] has dual carbs and mild cam.
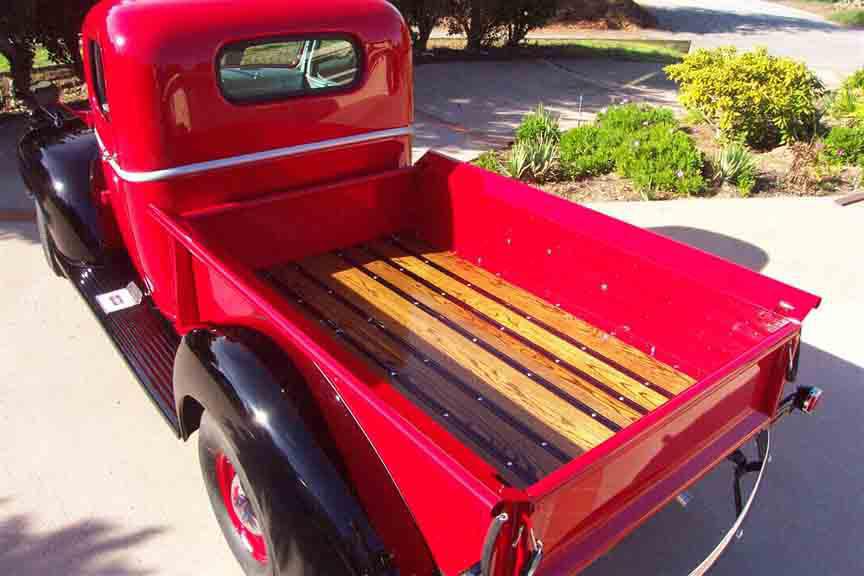
The bed of the truck [ pix ] is made of Oak, but I think it could come out just as nice with Pine. The key to the bed, or any project as far as that goes, is the prep. After taking out all the obvious defects with a medium sandpaper, give it a good going over with a fine grade such as 220. Then, make sure the wood is dust free before you start. Cleanliness is # 1.
I used a Walnut stain -- but before I selected Walnut stain, I purchased several trial size colors and tested it on scrap wood. I used three coats of Minwax Helmsman.
Use very light sanding between the first two coats, catching any small particles in the air that may have landed on the wood while you were waiting for it to dry. I used a spray gun this time, but I have used a brush and you have to remember not to brush the side of the paint can, if using a brush. You will get air bubbles in the paint and it will never give you that super smooth look. Also, never shake the can or stir it at any time. .
All parts of the truck have been rebuilt, replaced, or refurbished. Of all my builds, this is my favorite and I hope you enjoy it too.
You can go to my web site for more pictures.
Cecil
Well, Cecil, as always it's good to hear from you ... and see what you are up to. This '46 is as great-looking as the others. Now maybe more joy riding and less tinkering. Thanks for the good write-up. ~ Editor
-30-