1949 Chevy 6400
![]()
[an error occurred while processing this directive]
[an error occurred while processing this directive]
[an error occurred while processing this directive]
[an error occurred while processing this directive]
 |
||
Owned by Danny Acker Talking about this truck |
#2602
From Danny :
Hey gang! Here's an update on my 1949 Chevy 6400.
I finally got my brakes mostly restored and in working condition. I still need to hook up my rebuilt hydrovac up to the engine vacuum port to get the brakes full effect. I did some body work on the interior fenders, got those all cleaned up and painted.
I sandblasted and painted all the hubs when i did the brakes.
While I was at it, I decided to do all of the rear wheels. I still need to do the front wheels.
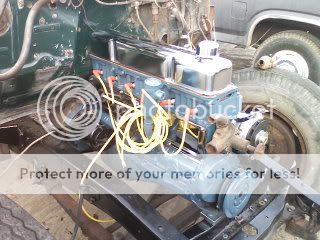
As for the engine, I finally started working on the intake leaks. I fixed it a little and got my engine to idle a lot lower which is good. Once I get the leaks all sealed up, it's time to start rewiring the whole truck.
I also got a new electric fan for it, too!
After that, I think it will be time to start putting those fenders back on which have been sitting in my barn since February 2008! They need sunlight -- and fresh new paint!
So after the body is complete, that pretty much wraps up my restoration. Of course, there's always gunna be little things along the way.
I'll be sure to keep you posted on some more updates!
Well, Danny, it looks like you are doing a great job with your first restoration of a classic truck! If you've had parts waiting since February last year .... that's NOTHING!! You should hear some of the other stories. ![]() We are talking about stuff waiting for ten years and better! Good luck and keep us posted. It will be great when you are able to drive the old gal! ~ Editor
We are talking about stuff waiting for ten years and better! Good luck and keep us posted. It will be great when you are able to drive the old gal! ~ Editor
[an error occurred while processing this directive]
18 May 2009
# 2602
From Danny :
Hello everyone! I'm 17 and would like to tell you about my first restoration project.
I guess I'll start with when and where I got this 1949 Chevy 6400 Advance Design truck. About three years ago, when I was on the bus heading home from school, I noticed an old truck sitting on someone's property. It had a "For Sale" sign on the window. My Dad and I were kinda looking for a truck for me that we could both work on together.
So after a couple weeks of seeing the truck sit there when we passed it on the bus, I would tell my friend "Hey, someday that truck will be mine and I'll get to work on it and make it run and drive it to school." He said "That big piece of junk? Sure ... whatever ... you'll never get that thing."
Sure enough, I talked to my Dad about it and he gives the guy a call about it. He says it doesn't run and has no brakes. We go and check it out. The truck has the stock 216 in it with everything except a radiator. As for the brakes, you could just push the pedal down and it would stay -- trashed main cylinder.
After some negotiating on the phone that night, they were able to come to a final price of $700. That weekend we went over to go tow home the truck (only a quarter of a mile down the road). My Dad chained up to the front of the truck and my neighbor to the back of the truck to act as brakes. When we got it home, I went straight to work with the pressure washer .
The project had begun.
Not long after, my Dad and I did a leak test on the 216 and found a crack the length of the block (probably freeze crack). Well, there goes that engine. What a good reason to tear apart the front end and clean and paint the chassis. Why not? Just do the whole chassis front to back, top to bottom while I'm at it?
After the long search of a new engine, we finally found a cheap 261. We brought it home and went to work on rebuilding and painting it... before and after .
Months and months later, we finally got the engine dropped in and hooked up. We got it to drive under her own power -- no more towstraps! Next was brakes which we are still in the process of doing. So far we have the backplates with shoes, springs and new cylinders hooked up. I'm just waiting for my wheel bearings and seals to arrive so I can put my hubs and wheels back on and drive it to the garage and install some brake lines so I can finally stop this beast.
Check out my photo bucket to see all the different stages of the restoration.
Thanks for checking out the truck! See ya in the forums!
-30-